Techmobile
Affichage des articles dont le libellé est windows. Afficher tous les articles

samedi 15 octobre 2016


ACOB
Although they're often times the primary source of income for websites, on-site advertisements can annoy even the most tolerable reader. That's why ad blockers have been some of the most popular downloads on Firefox and Chrome for some time now, demonstrating that when it comes down to it, most people just want nothing to do with ads shoved in their face.
And then Microsoft introduced Edge, a brand new web browser created from the ground up to replace the much-maligned Internet Explorer. Edge provides its users with a fast web-browsing experience and a couple of neat extras, like the ability to transform any website into an easy-to-read version, annotate it with highlights and text, and then quickly save it to OneNote.
There's just one problem: Microsoft Edge doesn't support extensions of any sort in its current form, and that means no ad blockers.
  • Don't Miss: 10 Need-to-Know Tips for Microsoft's Edge Browser
Luckily, there's a quick and easy fix, and today we're going to show you how to block ads in Microsoft Edge with a simple tweak using a nifty utility calledHostsMan.

Step 1
Install HostsMan

Follow the link below to download HostsMan, and once downloaded, extract the ZIP file and run the installer found within it to get it installed.

Step 2
Run HostsMan

Once installed, go ahead and run the program. When HostsMan launches, click onRun as Administrator.

Step 3
Manage Your Sources

After running HostsMan as an Administrator, click on Manage Sources and check the box next to MVPS Host, then click Close.

Step 4
Update Your Host File

After that, click on Check for Updates and let HostsMan search for updated host files. Once completed, the MVPS Host file will be installed and you will no longer have ads in Microsoft's Edge browser.
There you have it! We hoped you enjoy this quick and easy guide to blocking ads in Microsoft Edge. Let us know what you think down below in the comments

O
Microsoft did a wonderful thing in 2015: for the first time, it was offering a free upgrade to Windows 10 for all current Windows 7 and 8.1 users. And, if you were lucky, the upgrade process was relatively simple and painless. There were, however, some questions after the everything was said and done.
Since users were upgrading their systems over the internet, most Windows 10 users now found themselves in a situation where they did not have a physical copy of Windows 10, or even a Windows 10 activation code for that matter. This is a problem for anyone hoping to create a fresh installation of Windows 10 on their hard drive.
Luckily, we have a relatively simple solution for you. So join us as we show you how to create a Windows 10 installation disk, just in case you ever need to create a fresh install of Windows.

Step 1
Activate Windows 10

In order to create your installation media, you first need to upgrade your current Windows 7 or Windows 8.1 PC to Windows 10. The easiest way to achieve this is through Microsoft's free upgrade service that has most likely been hovering in your notification area for the last few months (you know, the area by your system clock).
This step is crucial for creating installation media, because, without upgrading to Windows 10, your product key for Windows 7 or 8.1 will not be able to activate Windows 10 on your new installation. Once you've upgraded to Windows 10, follow the instructions found in this article in order to activate your Windows 10 installation.
If you're already running a system with an activated Windows 7 or 8.1 installation, this step is unnecessary as the upgrade process will transfer your credentials to your new Windows 10 upgrade.

Step 2
Install Microsoft's Media Creation Tool

Next, you're going to need to download and install Microsoft's Media Creation tool. Follow the link below for to download it, then install like any other app.

Step 3
Creation Your Installation Disk

Once Microsoft's Media Creation Tool has been installed on your PC, find and launch the program. Upon opening it, the tool will give you a few options, but we're only interested in the Create installation media for another PC option. Select it, and then click "Next."
The next screen will give you more options regarding the type of Windows 10 installation media you wish to create. These options should already be selected for you, but review them just in case there is something that is not correct.
For reference, if your version of Windows 7 or 8.1 is a Home edition or anything else that is not a Professional edition, you will want a basic Windows 10 installation. If you're currently running a Pro version of Windows 7 or 8.1, choose the Windows 10 Pro edition. Once you have verified everything is correct, click "Next."
The next screen requires you to specify the type of installation media you wish to create. If you are using a USB, select USB flash drive; if you're using a DVD, chooseISO file. Once you've chosen your format, the media creation tool will ask you to specify the drive or disc you wish to use from your Windows directory. Choose your desired drive and select "Next."
After this, the media creation tool will begin to create the installation files onto your chosen format. This process normally takes anywhere from 15-20 minutes, depending on your internet connection, so give it time to finish.

Step 4
Using Your New Windows 10 Installation Disk

Once the Media Creation Tool is finished, you will now be able to create a fresh installation of Windows 10. To do this, simply enter your system's BIOS on startup and boot from your new installation disk.
To enter your system's BIOS in Windows 10, head to Settings -> Update and security -> Recovery. Then, under Advanced startup, select "Restart now." This will boot your PC into a menu by which you can now change how your system boots up. Have your Windows 7 or 8.1 product key available as you will need it to activate your installation of Windows 10.
We hoped you enjoyed making your new Windows 10 installation disk and we certainly hope it comes in handy. Let us know what you think down below in the comments

If you're having issues with your Google Chrome browser, such as crashes, unwanted pop-up ads, or finding that your home page is now set to some search engine you've never heard of, give Google's Chrome Cleanup Tool for Windows a try.
The Cleanup Tool searches for and removes malware like BrowseFox, Vitruvian, V-Bates, and many more.
All you have to do is download the Cleanup Tool to your desktop (or wherever you'd like), run the program, and it will hunt for malicious programs on Chrome and remove any that it finds.
This is the message Chrome Cleanup Tool displays if your computer is clean.
Click "Continue" once it's done, and the application sends you to your Chrome settings page (chrome://settings) and asks you to reset to default settings. You can reset if you'd like, but there's no reason to if you don't feel like disabling your extensions or clearing your cache. Just click "Cancel" if you don't want to reset your settings.
The application deletes itself after it's done working, so if you'd like to use it again you either need to re-download it from here, or look for it in your download history (Ctrl+J).
Right now, it's only available for Windows, so if you're having trouble on mobile or with a Mac, you can check out Google's suggestions here.

Windows users have looked on with envy at Mac owners wrangling torrents with ease for years. Now, finally, a new Windows torrent client is making downloads easier, safer, and more customizable.
Transmission, a go-to torrent client for Mac and Linux users since its creation in 2005, has finally released a Windows version.
Once downloaded, just run the installer file and you'll be up-and-running with Transmission in a couple of minutes.


The open-source application contains all of the features that drew Mac and Linux users to Transmission in the past. For starters, it's completely free of ads.
Privacy is also a hallmark, with encryption available and a magnet URI scheme. There's also more user control with regards to prioritizing downloads, as well as the ability to control transfers remotely through their web client's interface controls.


The Windows release isn't totally official, as developers have expressed that they're still fine-tuning the version to incorporate even more features—hence why you won't see a download link through official channels just yet.
Those looking to grab a version to give it a test run can visit the site's file list and scroll to the bottom to find the 32-bit and 64-bit versions (or just grab the links from above).

If you want to have windows .iso files for various purpose like you want to have windows 7 in virtualbox, then you need an .iso file. There are many methods of creating an .iso from installed windows. But what if microsoft provided all of them( I mean 7,8 &10) free of cost. The only requirement is that you own a product key for the respective Windows edition (and that's also is not a painful task to get).

Step 1
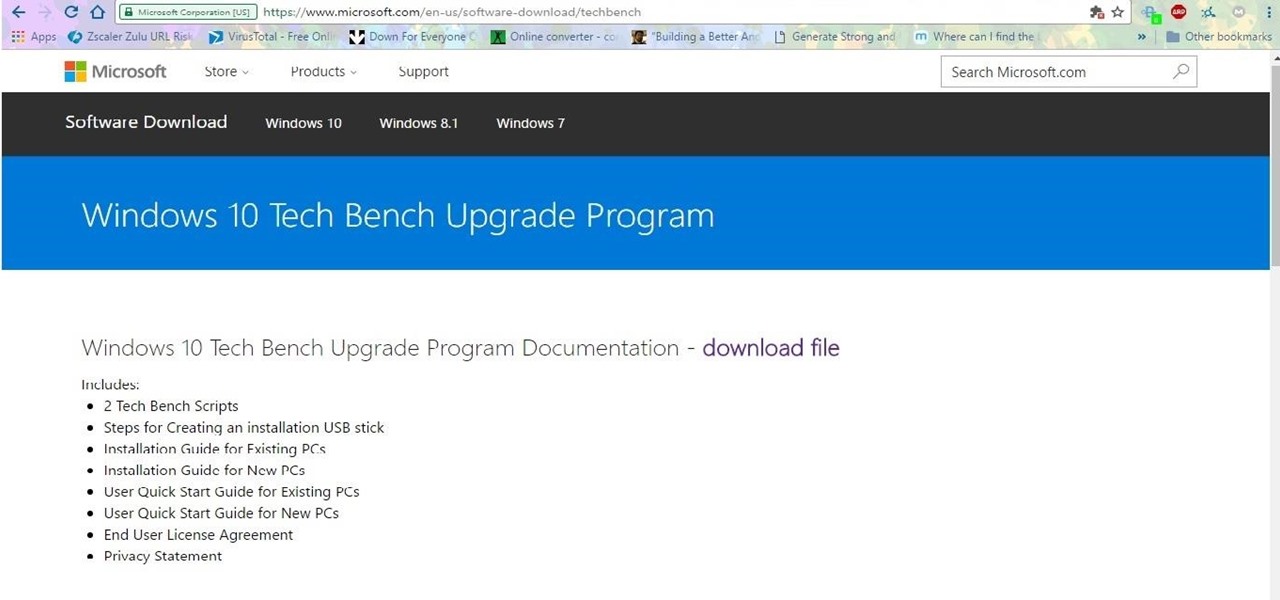
Go to Microsoft Site.

https://www.microsoft.com/en-us/software-download/techbench here, Microsoft has only provided the Windows 10 editions.

Step 2
Go to Pastebin

Now, you need to a simple JavaScript hack to make the page show all Windows 7,8 & 10 versions. open another tab and go to http://pastebin.com/EHrJZbsV and copy the the raw paste data.

Step 3
And Finally the JS Hack

now In your browser tab (which is in Step-1) press ctrl+shift+j (chrome & firefox) and paste the copied data and press enter.
wow! now you can download any windows version.
(Note that: the download link only exist for 24hrs from the time of creation.)